Contact Form plugin by Supsystic was created as one of the most simple, but functional at the same time. The developers team made a great job and tried to predict all the requirements our users could have. The functionality also contains different types of fields, which are accessible in free and of course, pro versions. Let’s have a small guide, which fields can you make in your Contact Form and which data can you gather from your users. We are definitely sure that Contact Form plugin by Supsystic is rather universal for any type f WordPress sites. From grids and portfolios to e-commerce online stores.
So to find your fields settings please, go through the path Contact Form by Supsystic> Your Contact Form (or Add New Contact Form button)>Fields tab

1. You can add any other fields type – by pressing the button Add New Field.
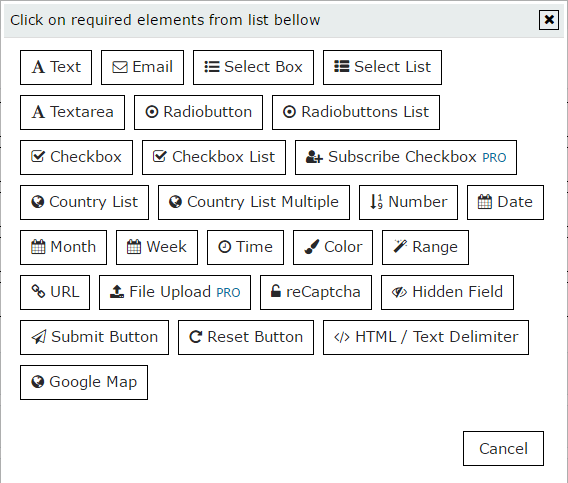
There is a long list of options/types, you get here. Look on this image and choose the one/or several you like.

- Text/Textarea – any text you want to get from your customer, maybe the long reply, some comments etc
- Email – your user email adress to contact
- Select Box – a list in your Form, here you can choose some points (select them from several)
- Radiobutton/Radiobuttons List – make a field option with radiobutton type of selection
- Checkbox/Checkbox List – make a field option with checkbox type of selection
- Subscribe Checkbox – an option for creation the subscribers – Pro option
- Country List/Multiple – make it to choose your customers their origin
- Number – a number multiple list
- Date/Month/Week/time – a box with date/month/week/time
- Color – color choosing for your boxing
- Range – allows user to set up value by moving position of a tag
- URL – add some URLS, links to the site etc
- File Upload – allows to upload and attach files – Pro option
- reCaptcha – helps to avoid spam. How to configure field with reCaptcha you can read here
- Hidden Field – your form will send you some hidden from user data, for example, user IP, user country code, user country name etc
- Submit Button – the most important button in your form – submit
- Reset Button – allows to clean all the fields by one clicking
- HTML/Text Delimeter – for users, who has basic knowledge
- Google Map – add a map created with Google Maps Easy plugin
2. You can edit the fields you already have

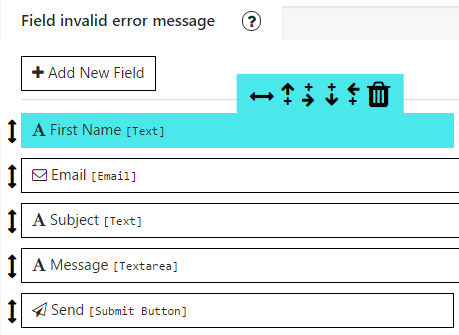
- Move field to the left or right
- Add New Field at the Top of this Field
- Add New Field at the Right of this Field
- Add New Field at the Bottom of this Field
- Add New Field at the Left of this Field
- Delete the Field
As you see on the picture at the left of the field you get an arrow. Click on it and move the field wherever you want. Yes, it is really so easy to change the order.
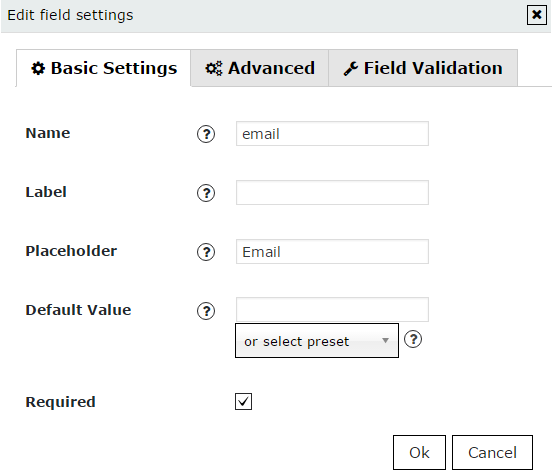
Double click on the field will open you a new custom tab – Fields Settings of your field. It contains three tabs and in each one you can change some detail of your field – according to all your requirements.

- Name – Name attribute for your field. You can use here latin letters, numbers or symbols “-“, “_” here
- Label – Field label – that your users will see on your Form right near your field
- Placeholder – Will be printed in your field as a tip
- Default Value – You can set default value for your field, and once it appears on your site – field will be pre-filled with this value. Or Select preset allows to insert some pre-defined values: current user IP address, user country code, user country name, page title, page url – to send you this data – Pro option
- Required – You can set this field required for your client or not
Advanced Settings
- Additional classes – You can specify here additional CSS classes for your field
- Additional styles – You can specify here additional CSS styles, that will be included in “style” tag, for your field
- Additional HTML attributes – You can specify here additional HTML attributes, such as “id”, or other, for your field.
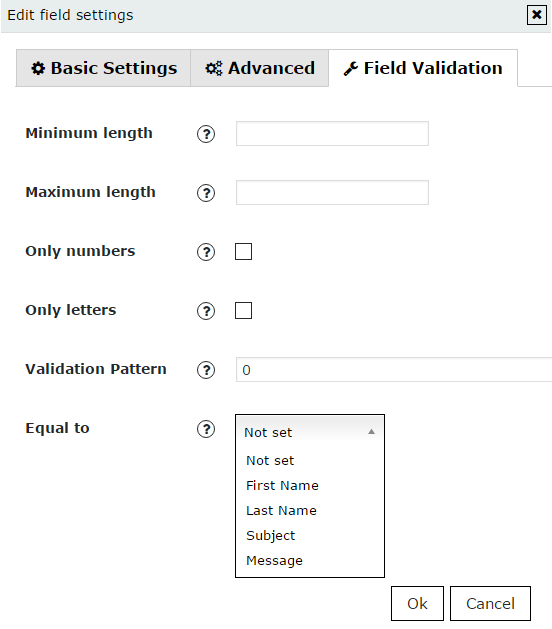
Field Validation
- Minimum length – Possibility to bound field minimum length
- Maximum length – Possibility to bound field maximum length. For Files fields types – this is restriction for file size, in Mb
- Only numbers – Allow users to enter in this field – only numeric values
- Only letters – Only letters will be allowed in this field
- Validation Pattern – You can modify or set here your custom patterns. Edit this ONLY if you know how to modify regular expression patterns! For Files fields types you can set here file extensions, separated by comma – “,”
- Equal to – Will require this field to be equal to other field from form. For example, use this is you want to create Email confirm fields.
As you can see – you have a really big variety for settings and options, that can be applied to your Contact Form. Need some more info? Go to the main page of Contact Form WordPress plugin.