Step 1: Installing WordPress Pricing Table by Supsystic
There are not so many steps to get your best result – install Visual composer Pricing Table WordPress plugin. Of course, the first of all – you need to download your future Pricing Table builder plugin file. The next upload your installation to the directory in WordPress (Admin Panel – Plugins – Add New). Click the button “Install” and wait until the end. After this, you can use your easy Pricing Table plugin (you will find a new menu item “Pricing Table by Supsystic”).
Installing Pricing Table Pro by Supsystic
After purchasing, you will find your unique link in a personal account of the site. Your task is to download an archive file pricing_table_pro.zip in the directory Plugins. After installation and activation of your plugin, you need to enter the unique license key (which you have in your personal account).
Your steps are the following:
- Find the Pricing Table by Supsystic in your admin panel of WordPress
- Click it and find there License tab
- Enter your email as login and license key
- Finish installation of your PRO version by clicking “Check”.
How can the PRO version of Pricing Table by Supsystic help you?
- The number of ultimate tables – Pro version has it for 1 site, if you buy the Corporate Pro version – tables for 5 sites
- Pro Templates – Your table can look really cool and modern with our Pro designs

Step 2: Adding a New Table in Pricing Table Plugin
There two ways to create new pricing table: with “Add New” Tab or Import from another plugin.
- Find and click Pricing Table by Supsystic on your admin panel of WordPressThen, click the insert “Add New Table”, type the name of it, choose the pricing table template and don’t forget to click “Save”.

- You can use Table Import/Export Tab to add new Table from the other place due to it’s html code. For this open this tab and choose Import to add new table. Paste table’s code into the blank window and click “Import” button. To learn more about it click here.

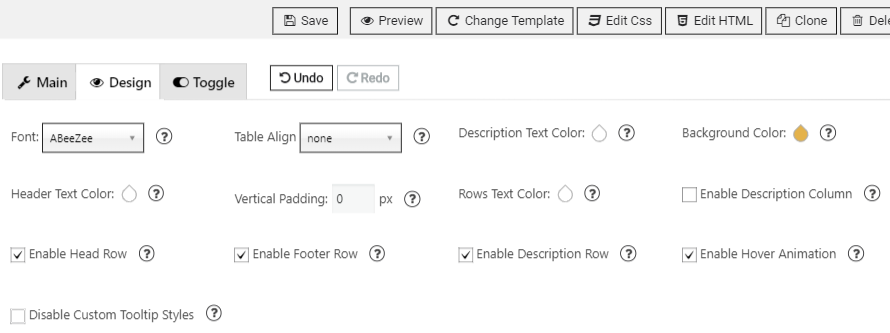
Step 3: Editing New Table in Pricing Table Plugin
- Check the Show All Tables insert, choose your table and click Editing
- Change the settings of your table you like:
- Columns number
- Rows Number
- Color Settings
- Descriptions
- Width
- Also, Undo and Redo buttons will help you in customizing.
- You can add tooltips for any element of the table.
- Customize your Pricing Table with “Edit CSS” and “Edit HTML” buttons.
Check more details about Main Settings.
- As you see on the screenshot below you can Edit CSS of every template and even clone it. The useful function for business owners. When you finish – don’t forget to “Save” it!
- The result of your efforts you can see by clicking the button “Preview”. If you don’t like it at all – click the “Change Template” and find the one you like.
The visual editor of the Pricing Table is available below the main settings table on the preview of your future table. To read additional information about Editors Settings click here.
Step 4: Adding Pricing Table to the site content
For adding your Table to the page you have two possibilities: Shortcode or PHP Code.

- Choose shortcode to insert Pricing Tables in your site page. For this copy it in the box above and insert into text editor of post or page and publish new or update existed site content —

- You can use PHP code too. In general it can be inserted at any place of the page code – to display exactly in this place, for example in the header or footer of the page. Besides it can be inserted in the code of template of the theme – to display on all pages.

Step 5: Adjusting additional options for Pricing Table
Don’t forget that ready-made table and whole plugin have also the Settings insert.
Main function here is User with such role can use plugin – User with the next role will have access to the whole plugin from admin area. You have several variants for choosing: Administrator, Editor, Author, Contributor, Subscriber. (PRO)

Back to the main page of WordPress Pricing Table plugin