With Free WordPress Membership plugin by Supsystic you will be able to set front-end registration form and login form for your communtiy without any efforts. In the article you’ll find
- How to setup Membership Registration Form
- Customzie Login Form
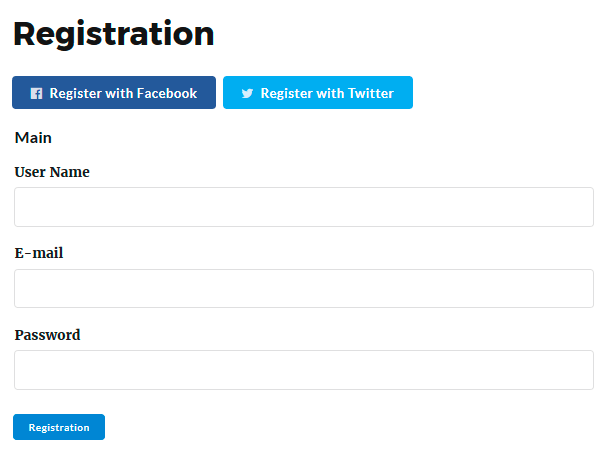
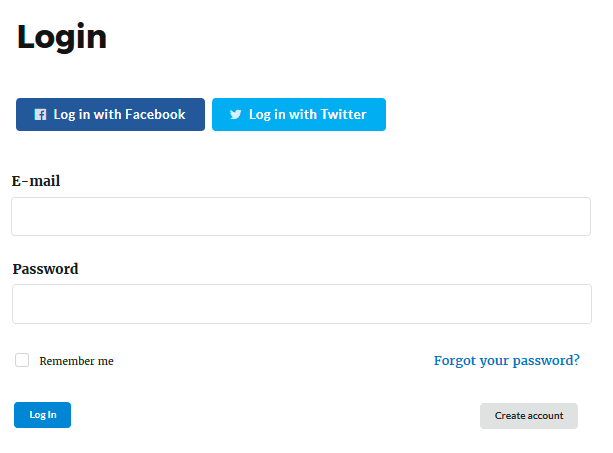
After installation and activation of Membership plugin go to the Main Settings Tab -> Pages, click Create all unassigned pages and Save Pages. Membership by Supsystic will automatically create Membership Registration and Login pages. Now you can simply add these pages to your site menu customizing Appearance -> Widgets.

Registration Page example |

Login Page example |
Customising Registration Fields
Fields for Registration you can configure on Profile tab -> Registration Fields. Here you can create fields of different types (text, email, password, date, checkbox etc). If you want to use field on Registration page – check the “Registration” checkbox for this field. Besides here you can make some fields required for filling.

Google reCaptcha Field
To configure field with Google reCaptcha on Registration page correctly fill in “Google ReCaptcha Site Key” and “Google ReCaptcha Secret Key” in it’s settings. If you don’t have these keys, follow the link to generate them. Also you can choose Google reCaptcha appearance theme, type and size. Customize other fields and Google reCaptcha Field is ready to work for you.
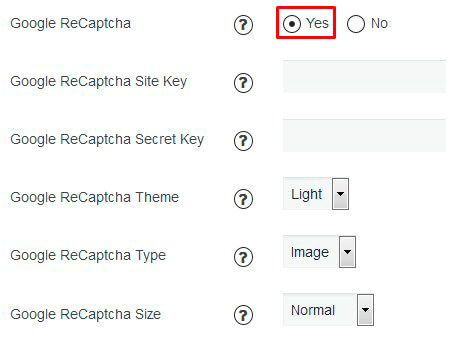
Additionally you have ability to add Google reCaptcha on your Login page: go to Design tab -> Registration and Login. At the following list click Yes on the checkbox with title “Google ReCaptcha” and paste your site key and secret key on fields below. As in Registration reCaptcha configuration here you can choose Google ReCaptcha Theme, Type and Size.

Profile Tab
Our Membership solution allows you to choose three variant of registration process which you can find on Profile tab –
- Auto – after registration will be automatically created and activated the membership account for user.
- Email confirmation – after registration user will receive the confirmation message on his/her email address. To activate the account, he/she will need to click the link inside the confirmation letter to confirm the email address.
- Administrator confirmation – in this case after the new user registration – administrator will receive Pending Review Email. In this letter administrator can check the information about new user and make the decision – approve or reject the account. To make decision – go to Users page in WordPress menu -> find the user profile -> click Edit -> choose the Status for account – Active or Rejected. Besides here you can select another status – Deleted, Disabled, Pending Review. After the administrator will choose the status – user will receive the email about the admin decision.
Emails Tab
Emails tab allows you to customize the send options and templates of emails:
- Mail appears from – name of site that will be indicated in emails.
- Mail appears from address – this email will be used as Sender.
- Use HTML for E-mails – allows to use html markup language to edit the text in emails.

Also on Mails tab -> Emails section you will be able to enable and edit such emails templates –
- Account Welcome Email – email that will be sent to user after signing up.
- Account Activation Email – email will be sent to user, so he could confirm his email and activate the account after registration.
- Pending Review Email – email will be sent to user if he needs to wait till admin will approve his account.
- Account Approved Email – email will be sent to user after his account has been approved and activated by admin.
- Account Rejected Email – email will be sent to user if admin rejected his account.
- Account Deactivation Email – email will be sent to user if his account has been deactivated.
- Account Deleted Email – email will be sent to user if this account has been deleted.
- Password Reset Email – email will be sent to user if he forgot the password and wants to reset it.
- Password Changed Email – email will be sent to user if he has requested to change the password.

Notifications Tab
With Notifications tab you will be able –
- Set Messages Refresh Period – enter the time for intervals with which messages will be updated.
- Specify Admin E-mail Address
- Enable and edit such notifications templates –
- New User Notification – message that admin will receive after a new user signs up. In case you don’t want to get this email just turn this option off.
- Account Needs Review Notification – message that admin will get if some account needs to be reviewed.
- Account Deletion Notification – admin will get this email after some account has been deleted.
Besides you can reset any of email or notification templates to default or send a test email with this template.

Design Customization
Inside Back-End Settings of Membership Plugin you can customize design of your Login and Registration pages appearance. Go to Design Tab -> General and set the needed color for buttons and placeholders. At Registration and Login Tab you can set Login and Registration Buttons texts, it’s URL and enable Google reCaptcha.
Adjusting Redirection
Besides – Membership by Supsystic offers you to set redirection of users to specific pages after login or registration on your site. Check it on Main tab of plugin settings. Choose the Redirection page after such actions – Registration, Login, Logout or Account is deleted to. At Security Tab you can enable or disable Redirect from backend login screen to membership login page.

Social Login
And last but not the least – you can improve your site users experience with installing Social Login Membership Pro Addon. It will allow your users register to your site with Social Networks Accounts and further login in Membership in two clicks with the same Social Accounts.