Step 1: Choosing the cloud storage
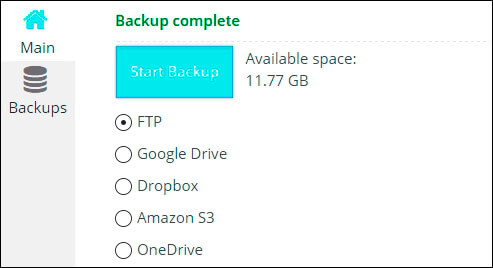
Primarily on the Main tab you need to choose the cloud storage where you prefer backups to be stored With Backup plugin by Supsystic you can backup to:
- FTP server
- Google Drive
- Dropbox
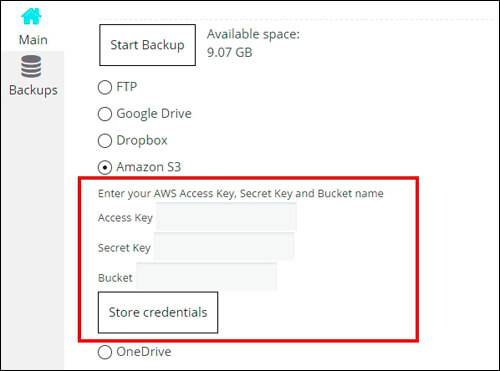
- Amazon S3
- OneDrive

To create backup to Google Drive, Dropbox, Amazon S3 or OneDrive, at first you need to authenticate your account. For all cloud services (except Amazon S3) it is very easy – just click “Authenticate”.
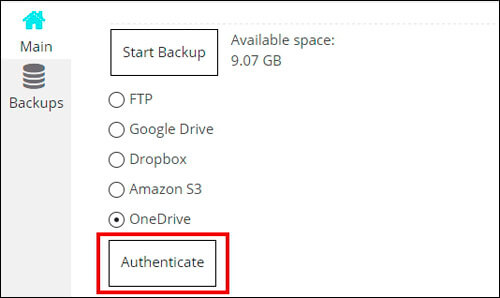
If prompted request for permission to access to your account – press “Allow” button to give permissions to upload the backup files on your account. Then on your cloud service will be created “Backup by Supsystic” folder with one more folder inside (folder with the name of your site), where the backups will be stored.
If you want to backup to the Amazon S3 – you need to know your access key ID, secret access key and name of the basket (which exists on Amazon S3) where backups will be stored. To get your access key ID and secret access key you must follow the next steps:
- Open the IAM console.
- From the navigation menu, click Users.
- Select your IAM user name.
- Click User Actions, and then click Manage Access Keys.
- Click Create Access Key.
- Your keys will look something like this:
- Access key ID example: AKIAIOSFODNN7EXAMPLE
- Secret access key example: wJalrXUtnFEMI/K7MDENG/bPxRfiCYEXAMPLEKEY
- Click Download Credentials, and store the keys in a secure location.
After these steps – enter the keys and name of the basket in the appropriate fields, then click “Store Credentials” button.
Step 2: Customization of Backup by Supsystic
Choose the backup preset – what exactly you want to backup and how you want to backup:
- Full Backup
- WordPress Core – all folders and files backup, in the root directory, where the WordPress is installed, except the /wp-content folder
- Plugins folder
- Themes folder
- Uploads folder
- Any folder inside wp-content
- Safe update – if the checkbox is set up, the database backup will be performed. This will let the database backup work in the transaction mode, i.e. should there occur any failure during the data base recovery, no data from the data-base backup will be transferred to the data-base. The data-base backup recovery will occur if and only there were no failures during the process. If the checkbox is not set up the data-base backup will be performed without transaction mode
- Force backup – when backup is performed, the labels are usually put at the beginning of the file dump, such as: WordPress version for the backup; WordPress data-base version for the backup; the plugin version for the backup. At recovering, if the force has been off, the backup will not be performed, because it will constantly pop up with the message, that the version is incorrect (the version of WordPress, the version of WordPress data-base or the plugin version). If the force has been on, there will be no such system check and the recovery will be performed
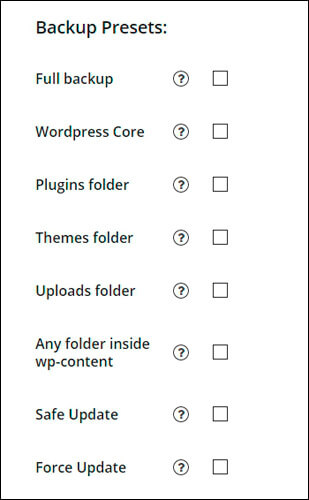
You can select several items at one time. If you choose a full backup – all checkboxes will be automatically activated (including the database backup).
Besides you have the ability to:
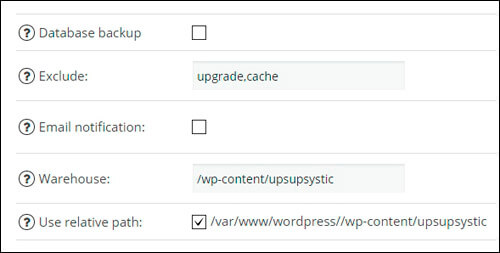
- Create only Database backup
- Exclude files and folders from the backup
- Enable email notification – activate checkbox and enter the email address where you want to be notified about how did the backup process passed.
- Specify the warehouse where the data is to be backed up – if ‘Use relative path’ checkbox has been set up, the path will be set against in the root directory, where the WordPress is installed. If ‘Use relative path’ checkbox has been of, the full path to the disk root should be specified in the Warehouse field.
- Use relative path – if the checkbox has been set up, then the backup path must be specified in the Warehouse field against the root directory, where the WordPress is installed. if the checkbox has been off, then the backup path must be specified in the Warehouse field against the disk root.
Step 3: Creating the backup
After you have selected the cloud storage and have specified all the settings, click “Start Backup”. Wait while your site is being backed up. It can take a while if your website is large. It depends on your site and hosting how much time will take the process. While plugin is backing up your website, you are not able to create another backup.
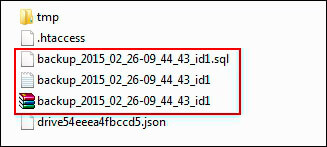
When you see the message “Backup complete”, you can check the folder with backup. There you should see the archive with backup, log file and .sql file (sql file will be created only if you set the database backup). All this files will be with the same ID in the name.
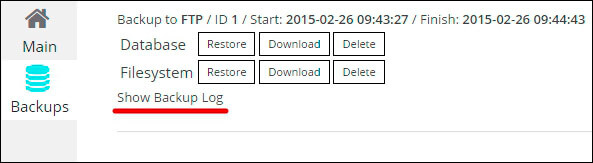
On Backups tab will appear a new entry with Database ( if you marked Full Backup or Database Backup) and Filesystem backup files. On top will be shown where has been made backup, the ID of backup files, the date and time of the backup. You can restore, download (only if it was backup to FTP server) or delete backup, simply click on the appropriate button.
Also here you can view the log file of backup – just clicking “Show Backup Log”.
Step 4: Backup restoration
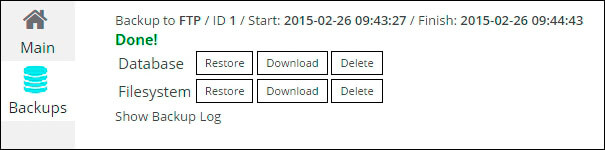
In order to restore the backup you need to go to the Backups tab, select the backup files you want and click “Restore” button. When you see the message “Done!” – restoration will be completed.
If the backup you want to restore is on your computer, then upload it to the folder on the FTP server where you store the other backups. By default backup is stored in ‘upsupsystic’ folder (you can find it in the root directory, where the WordPress is installed, using this path /wp-content/upsupsystic/). Then files of this backup will appear on the Backups tab and you will be able to restore them.