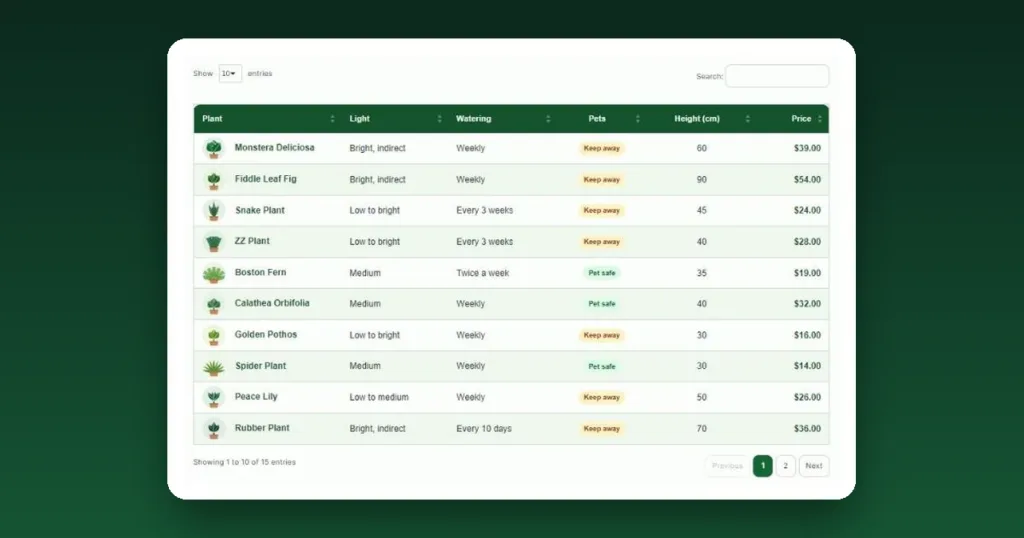
Elementor makes page design fast, until the page needs a table. A price list, a class timetable or a product comparison is data that visitors want to scan, search and sort, and the free version of Elementor has no table widget for it. The usual workarounds are a table typed by hand in the HTML widget or a screenshot of a spreadsheet. Neither can be searched or sorted, both are a chore to update, and both tend to break on phones.
This guide adds a real, interactive table to an Elementor page with a free plugin, Data Tables Generator by Supsystic. You build the table once in a spreadsheet-style editor, drop it onto the page with its own Elementor widget, and visitors get search, sorting, pages and a layout made for phones. Our example is a price list for a small plant shop called Fern & Fig.

What you need
- WordPress with Elementor. The free version of Elementor is enough; you do not need Elementor Pro.
- Data Tables Generator by Supsystic, free on WordPress.org and used on 19,000+ sites. Install it from Plugins → Add New Plugin (search for “Data Tables Generator”) or download it here.
After activation you will find Data Tables by Supsystic in the WordPress menu, and a new Data Tables by Supsystic widget in Elementor.
Step 1. Create the table with the wizard
Open Data Tables by Supsystic → Add new table. A short wizard asks what you want to build and prepares a finished table with sample rows, the right settings and a design, all with a live preview on the right.
- Your goal. Pick Price list or inventory. Other goals cover directories, schedules, comparisons, rankings, pricing plans and WooCommerce product tables.
- Your data. Keep the sample rows for now; you will replace them in the next step.
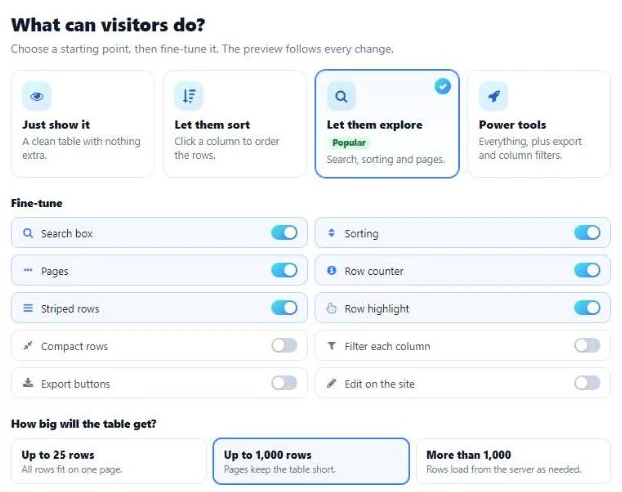
- Visitors. Choose Let them explore. It turns on the search box, sorting, pages, the row counter, striped rows and row highlight.
- Size. Up to 1,000 rows splits the table into pages, so a long list stays short on the screen.
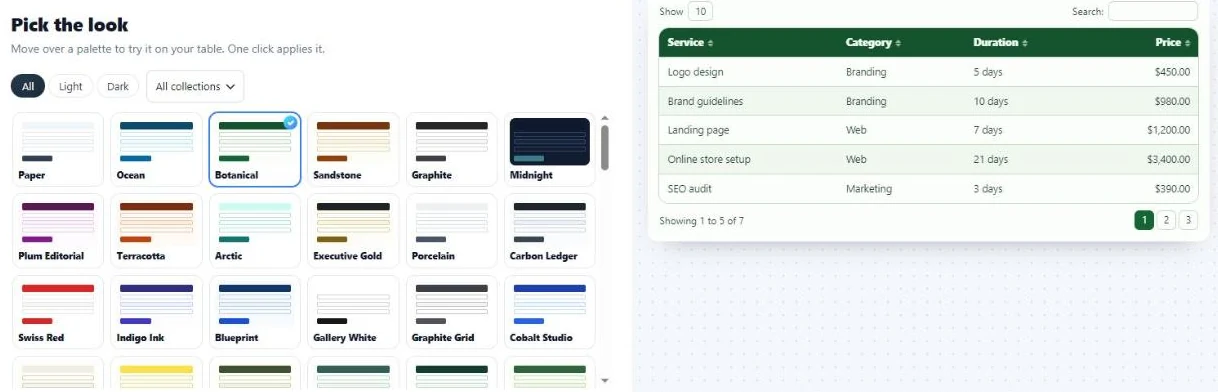
On the Design step, move the mouse over the palettes to try them on your table, then click the one you like. We picked Botanical, one of five free palettes (Paper, Ocean, Botanical, Sandstone and Graphite), because it suits a plant shop. Name the table and click Create my table.
Step 2. Put in your own rows
The wizard opens the table editor. It works like Excel or Google Sheets: click a cell and type, or copy a range from a spreadsheet and paste it into the grid. Rows and columns are added with the Row and Column buttons in the toolbar.
A few touches make a price list easier to read:
- Pictures in cells. Select a cell and click Insert Media to add an image from the Media Library. We added a small icon in front of every plant name.
- Currency format. Select the price cells and pick Currency in the format menu (the € button). Type 39 and visitors see $39.00, and the column still sorts by number.
- Alignment. Center short values such as the height and right-align the prices so the digits line up.
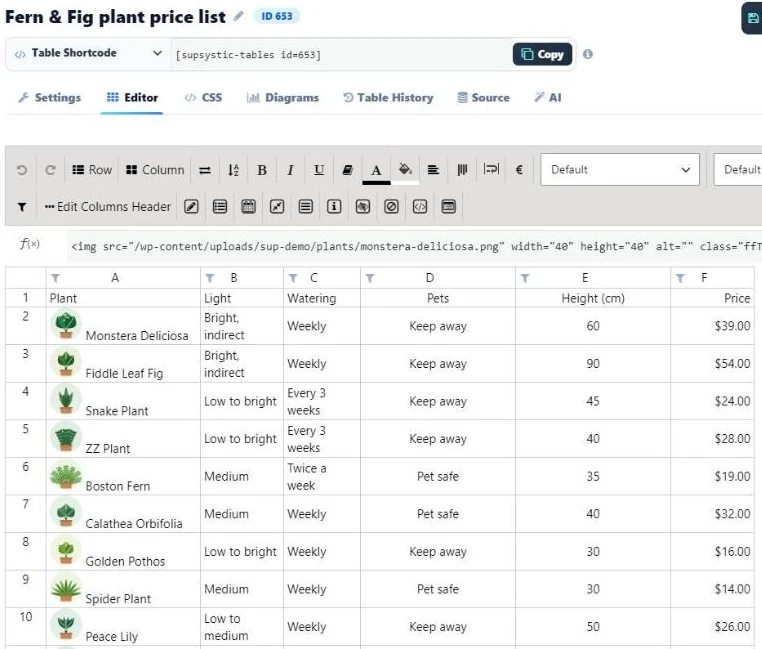
Click Save. The table now has its own shortcode, [supsystic-tables id=653] in our case, but in Elementor you will not need it.
Step 3. Add the Data Tables widget in Elementor
Open your page with Edit with Elementor. In the Elements panel, type table into the search box. In the free version of Elementor the results are our two widgets and two locked Pro widgets, Price Table and Table of Contents, neither of which is a data table.

Drag Data Tables by Supsystic into the container where the table should go. (The Tables Widget next to it is the classic WordPress widget for sidebars.)
Step 4. Pick your table and publish
With the widget selected, open Content → Table and choose your table in Select table. The list shows every table you have made, by name.

Click Publish (or Update) and open the page. The table appears with the palette, formats and features you chose in Data Tables.
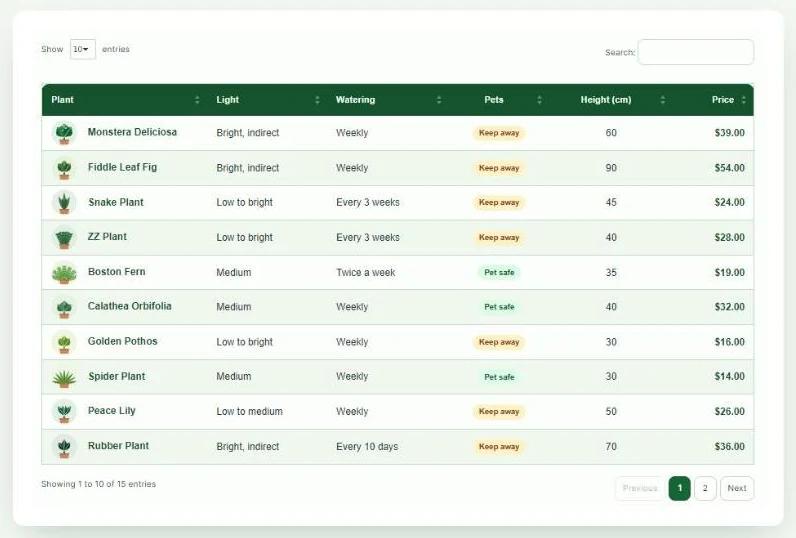
Tip: for the card look in our example, put the widget inside its own container and give that container a white background, rounded corners and a soft box shadow in Elementor’s Style tab. Elementor styles the frame; Data Tables styles the table.
Step 5. Let visitors search and sort
Because we chose Let them explore in the wizard, the table already does the work a visitor expects. Typing pet safe into the search box leaves the six plants that are safe around cats and dogs, and a click on Price sorts them from cheapest to most expensive. Click the header again to reverse the order.
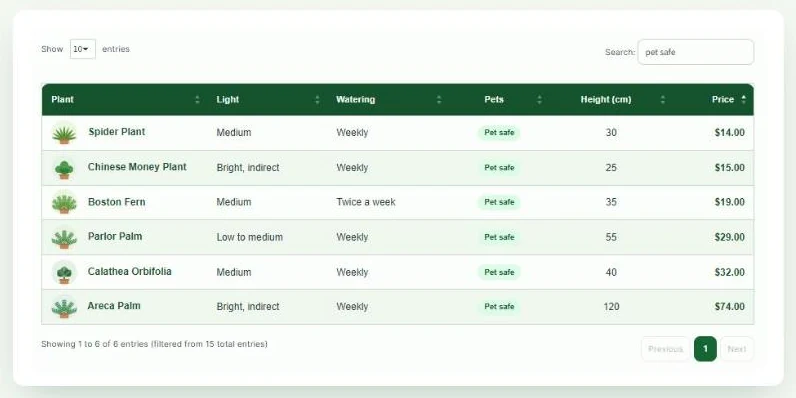
You can change all of this later in the table’s Settings → Features tab: the default sort column and order, pagination, the row counter, and search options such as searching by column.
Step 6. Make the table fit phones
A six-column table does not fit a 390-pixel screen as it is. Data Tables gives you five ways to handle that in Settings → Features → Responsive Mode:
- Standard Responsive mode puts each cell on its own line when the columns do not fit.
- Automatic column hiding hides columns from right to left when they do not fit and shows them under a + button on each row.
- Column Hiding with Settings lets you choose which columns stay visible on desktop, tablet and mobile.
- Horizontal scroll keeps the full table and adds a scroll bar.
- Disable Responsivity keeps the default fluid layout.
We used Column Hiding with Settings. Click Open Settings next to Column Hiding Settings and list the column numbers to keep: 1,6 (Plant and Price) for mobile and 1,2,4,6 for tablets.
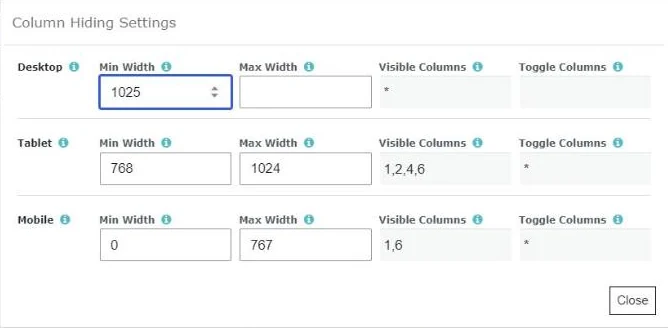
On a phone each row now shows the plant and its price, and the + button opens the light, watering, pet and height details right under the row.
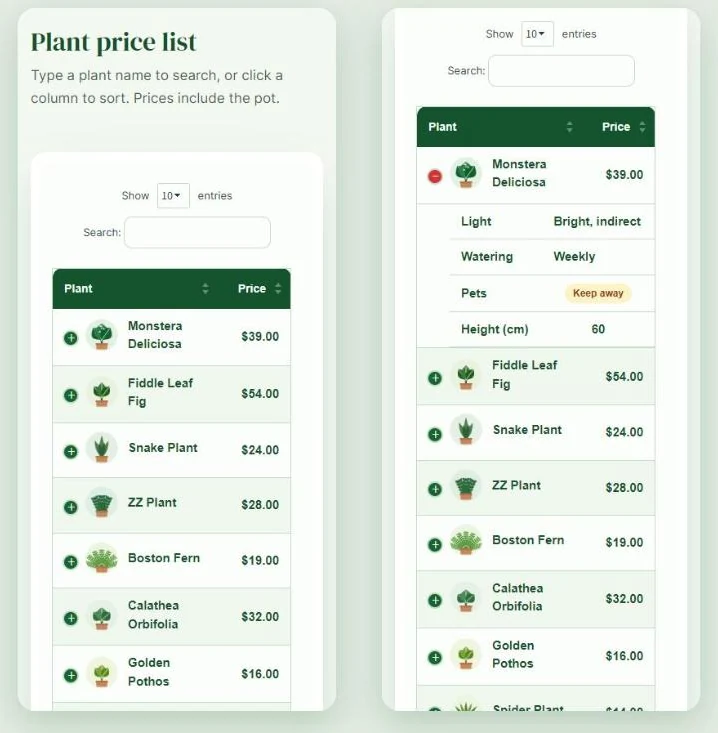
To check it, open the page on your phone or make the browser window narrow.
Step 7. Match the table to your brand
The palette sets the header, stripes, borders and controls in one click. For finer control, the Styling tab changes colors, fonts and borders, and every table has its own CSS tab for rules that apply to that table only.
The green and amber “Pet safe” and “Keep away” labels in our example are plain text in a span with a class, styled in the CSS tab. Replace 653 with the ID of your table:
#supsystic-table-653 .ffPill { display: inline-block; padding: 3px 10px; border-radius: 999px; font-size: 12px; font-weight: 600; }
#supsystic-table-653 .ffYes { background: #dcfce7; color: #166534; }
#supsystic-table-653 .ffNo { background: #fef3c7; color: #92400e; }
Other ways to add the same table
The widget is the easiest way in Elementor, and the same table can go anywhere else on your site as well:
- Shortcode. Paste
[supsystic-tables id=653]into Elementor’s Shortcode widget, a text block, or any theme or page builder that accepts shortcodes. See how to add a table to your site. - Block editor. On pages built with Gutenberg, add the Data Tables by Supsystic block and pick the table from its list.
Whichever way you use, there is only one table. Edit a price in Data Tables, click Save, and every page that shows the table is up to date.
Going further with Pro
Everything above is free. When the table grows, Data Tables Pro adds dropdown and range filters for each column, conditional formatting that colors cells by their value, charts made from the table, export buttons for visitors (CSV, Excel, PDF and print), editing on the front end for chosen users, and tables that stay in sync with a Google Sheet.
FAQ
Does Elementor have a table widget?
Not in the free version. Data Tables Generator adds a free Data Tables by Supsystic widget that shows any table you build in the plugin, with search, sorting, pages and a mobile layout.
Do I need Elementor Pro?
No. The widget works with the free version of Elementor, and every step in this guide uses free features.
Can I use one table on several pages?
Yes. Add the widget or the shortcode wherever you need it. All copies show the same table, so you only update it in one place.
Can I paste data from Excel or Google Sheets?
Yes. Copy a range of cells and paste it into the editor. Importing whole CSV or Excel files and keeping a table synced with a Google Sheet are Pro features.
Can I add images and links to table cells?
Yes. Use Insert Media for images and the link button in the toolbar for links. See how to insert images and icons.
Can search engines read the table?
Yes. The table is real HTML text on the page, not a picture, so search engines can read every row.
What if my table has thousands of rows?
Turn on Server-side Processing in the pagination settings, or choose More than 1,000 rows in the wizard. The rows then load from the server page by page, so the page stays fast.
Add your first Elementor table
Data Tables Generator is free on WordPress.org and is used on 19,000+ WordPress sites. Install it, let the wizard build your first table, and drop it onto an Elementor page with the Data Tables widget.
Download Data Tables free | See Pro plans | Explore Data Tables
More: Table examples · Responsive modes demo · Make a table responsive · CSS editor guide · All free plugins