Authorization
To subscribe to MailChimp you need to enter your MailChimp API key and then choose the name of list for subscribe. To find your MailChimp API key – follow the instructions below:
- Login to your mailchimp account at http://mailchimp.com
- From the left main menu, click on your Username, then select Account in the flyout menu.
- From the account page select Extras -> API Keys.
- Your API Key will be listed in the table labeled “Your API Keys”.
- Copy / Paste your API key into “MailChimp API key” field.

- In the List for subscribe choose a list

Note: All information about your subscribers you can find in your MailChimp account. Go to your Lists and choose the one that you specified when customize the subscription option of popup.
Additional settings
Besides, here you can skip the step of confirmation the subscription – with Disable double opt-in. It will create subscriber directly after he will sign-up to your form.
There is also a possibility to select Groups for subscribe – your new subscribers will be added to selected groups.
Custom fields
Also you can add Custom fields which will be shown in your pop up. To do it follow the next steps:
- Go to your MailChimp account and open the list you want to add custom fields to.
- Go to Settings and choose List fields and *|MERGE|* tags in dropdown menu.
- Click Add A Field button and select field type.
- Insert field name, copy its tag and save changes.

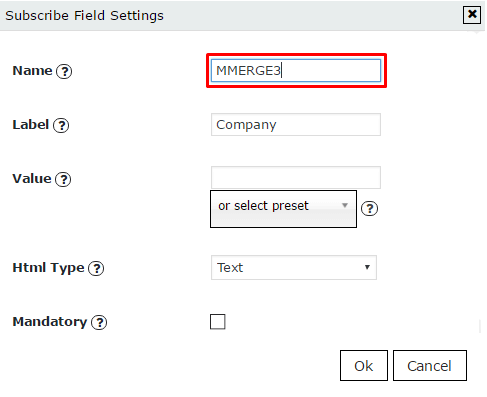
- Go to PopUp plugin setting window and open Subscribe tab of that pop up where you want to add Custom field. Click on Add button

- In the Name field insert the tag you’ve copied in step 4

- Add label for this field, click ‘OK’ and save changes.
Now in pop up your visitors will see your Custom field.