Connect Membership Profile with Social Accounts and post to the website membership and social networks on one click.
Step 1: Installing Social Network Integration ProAddon
In WordPress, navigate to Plugins > Add New. Search for “Membership by Supsystic” and click Install Now. When the installation has completed, click “Activate Plugin”. You will have a new admin menu item titled “Membership by Supsystic”.
Then, in your personal account on supsystic.com, you will find a unique download link after purchase. After downloading the file (membership_by_supsystic_social_network_integration.zip), navigate to Plugins > Add New > Upload and upload the file. When the installation has completed, click “Activate Plugin”. After activation of the PRO addon, you need to enter license key (you can find it in your personal account on our site). To do this follow next steps:
- Go to Membership by Supsystic in WordPress navigation menu.
- Click License tab on the left navigation menu of plugin.
- Enter your email and license key.
- Click “Activate Addon” button.
Step 2: Adjusting Social Network Integration
On the left navigation menu at Extensions Tab of Membership Plugin you can find Social Network Integration Settings. Here you can adjust integrations for next Social Networks:

Facebook has next additional settings —
- If you want to Use your own social network app – then you will need to fill in parameters below. If you disable it the plugin will use Supsystic app for Facebook
- Facebook App ID
- Facebook App Secret
In order to enter correct data for this parameters, please read this insrtuction.

Twitter has next additional settings —
- If you want to Use your own social network app – then you will need to fill in parameters below. If you disable it the plugin will use Supsystic app for Twitter
- Twitter API Key
- Twitter API Secret
In order to enter correct data for this parameters, please read this instruction.

Also, there is Social Network Integration (PRO) option on the Main Settings Membership Tab. Turn it on to provide ability for your members to post in other social networks simultaneously.
Step 3: Integration of Social Networks with your Membership account
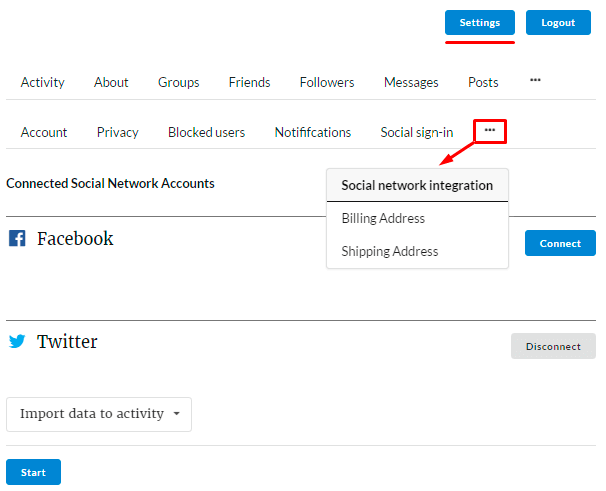
To enable ability to share posts automatically in several Social networks, firstly you have to register or login to your Membership account. Then, at the Settings Tab select Social Network Integration tab. Here you can manage your integrated connection to different Social networks accounts.
To do it, click Connect button opposite appropriate Social Network. Disconnecting from current social network is as easy as connecting, you can do it at any time, just press Disconnect button.

Right after connecting, for ex., to Twitter click Import Data to Activity to see next settings:
- Import Data to activity – transmits your Twitter (or any other network) posts to Membership wall.
- Export data from activity – transfers your activity posts from Membership to Twitter and so on.
- Import data to activity by hashtags – transmits your Twitter (or any other network) posts by hashtags to Membership wall.
- Export data from activity by hashtags – transfers your activity posts from Membership by hashtags

Choose one and click Start button.
You can check import/export process by visiting corresponding account wall.
If you have selected Import data to activity by hashtags or Export data from activity by hashtags, then you need to enter hashtags name in popup —

and click Export / Import button.
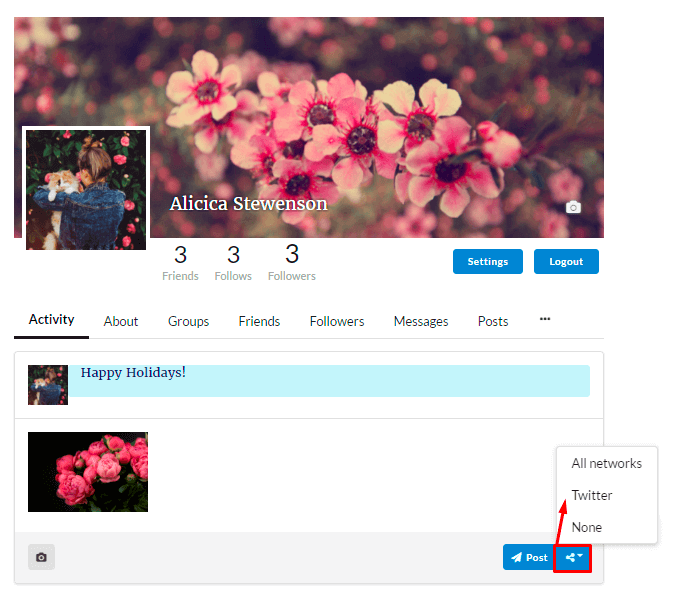
Also, you can export the post in the same time you create a new one in your profile activity. Before posting, choose needed exporting adjustment near Post button —
