Represent the data using Data Tables Generator plugin and try how it is easy and friendly to use. All information about the plugin that you could need:
Installation
Settings
Table elements
Features
Appearance
Source
Editor
Preview
Diagrams
Table History
Add a Table to website
Settings tab
Step 1: Installing Data Tables
In WordPress, navigate to Plugins > Add New. Search for “Data Tables Generator by Supsystic” and click install. When the installation has completed click “Activate Plugin”. You will have a new admin menu item titled “Tables by Supsystic”.
Step 2: Creating a Responsive Table
- On the left navigation menu click “Add new table”.
- Enter the title of the table, set the number of Rows and Columns.
- Click “Ok”.

Step 3: Customizing the Data Tables by Supsystic
In order to change the configuration of tables – open the “Settings” tab.
Here you can set all of the options of Data Tables Generator plugin.
-
Main Settings
Table elements
Here you can select the elements of the table that will be displayed on the site page.
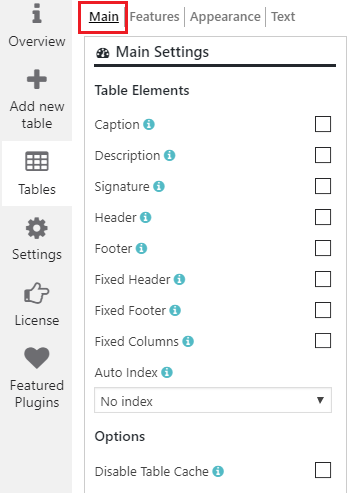
- Caption – display the title of the table.
- Description – short description of the table between title and table.
- Header – display the first row as a header of a table. Also, you can set amount of rows which will be moved to the header.
- Signature – add signature under table footer.
- Footer – display the first row as a footer of a table.
- Fixed Header – allows to fix the table’s header during table scrolling.
- Fixed Footer – allows to fix the table’s footer during table scrolling.
- Fixed Table Height – if you check fixed header or fixed footer this option will appear to set the table’s height and create a vertical scroll.
- Fixed Columns – allows to fix columns during table scrolling.
- Left/Right Columns Count – number of columns to fix by the left/right side of the table.
- Auto index – add an auto index to your table. Here you can use the first column as an index or create a new column for this purpose.
- Disable Table Cache – This feature is necessary for those cases when the table contains the shortcodes. By checking the box, you can make sure that they will be rendered correctly and won’t be influenced by a cache.
Data Formats
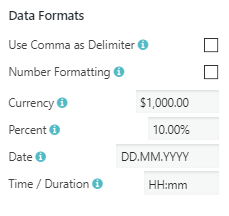
- Use Comma as Delimiter – Use a comma as a delimiter of integer and fractional parts of number for editable fields on the frontend.
- Number Formatting – set format of all numbers in the table
- Currency – Set output format for currencies. Supports only 1 currency for 1 table. Besides here you can establish needed divider between integer and fractional parts and quantity of zeros at fractional part. For example:
$ 1,000.000
€ 1.00 - Percent – Set output format for percent numbers. For example 10.00% , 10%
- Date – set output format for the date. For example YYYY-MM-DD – 1991-12-25 DD.MM.YY – 25.12.91
- Time / Duration – Set output format for time and duration. For example:
1) time
HH:mm – 18:00
hh:mm a – 9:00 pm
2) duration
hh:mm – 36:40
hh:mm:ss – 36:40:12
WPCom_Markdown class is not exists
Learn more about Table elements here.
Features
Here you can activate additional functions to work with the table.
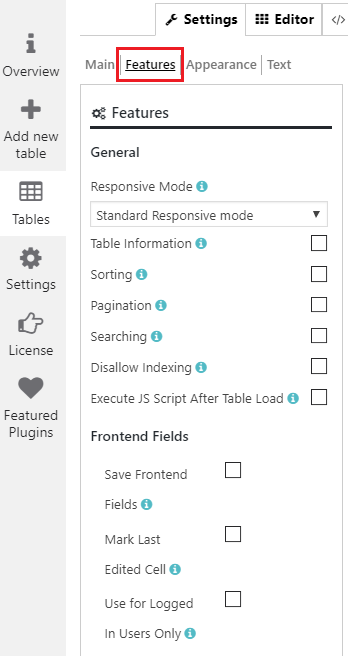
Standard Responsive mode – in this mode if table content doesn’t fit all columns become under each other with one cell per row.
Automatic column hiding – in this mode table columns will collapse from right to left if the content does not fit to parent container width.
Horizontal scroll – in this mode scroll bar will be added if table overflows parent container width
Disable Responsivity – default table fluid layout
- Table Information – display information about table entries.
- Sorting – sort data by ascending or descending.
- Pagination – enable page control, divide the content of the table into discrete pages – lets users tap through a series of related pages.
- Searching – enable search by the table.
- Disallow Indexing – disable table indexing for search bots.
Also with Pro version of a plugin you get such options:
- Save Editable Fields – allows saving data to the table through editable fields.
- Use Editable Fields for Logged In Users Only – allows using editable fields only for logged in users.
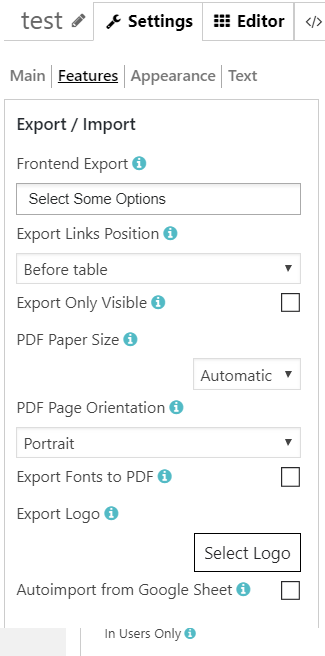
- Front-end Export – allow printing the table or export to PDF, CSV, XLS on the frontend.
- PDF Paper Size – choose the paper size for PDF pages
- Export Page Orientation – choose the page orientation for PDF export file: portrait or landscape.
- PDF Export Font – if you use some specific characters (Greek, Cyrillic etc.) it is better to check this box for PDF export.
- Export Logo – automatically adds selected logo for output PDF or printing.
- Auto-import from Google Sheet – If checked – table data on the frontend will be overloaded from selected Google Sheet. Read more about how to organize Auto Import form Google Sheets.
Read more about Front-end Editing Feature.
Appearance
Here you can choose a visual style of the table.
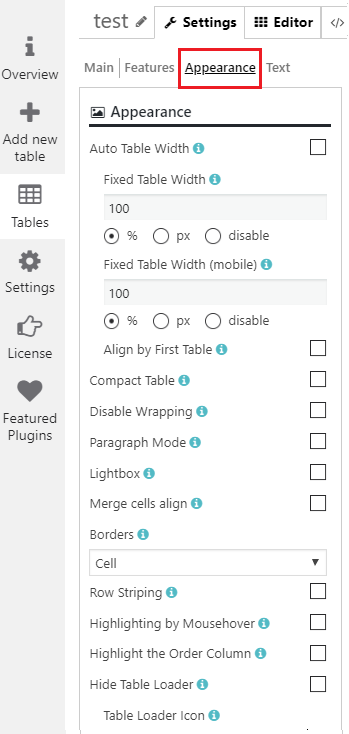
- Auto table width – automatic detection of the cell width. If checked – width of table columns will be calculated automatically for table width 100%.
Otherwise – you can set a table width manually: columns width will get from Fixed Table Width option (toolbar on Editor tab) or calculated depending on the width of the column in the table editor.
If you do not want to apply columns width at all – you should uncheck “Auto Table Width” option, set “Fixed Table Width” option to “auto” and check “Compact Table” option. - Fixed Table Width/ Fixed Table Width (mobile) – Set fixed table width in px or %. Choose “disable” to make the table width adjust by table content.
- Compact Table – decrease the amount of white space in the table.
- Align by First Table – if checked, this table will be resized by first Supsystic table on the page. Important! This option makes sense only if the table is not on responsive mode or responsive mode is disabled. Also if the first table has a different count of columns or different settings, their sizes may not be equal.
- Disable Wrapping – disable wrapping of content in the table, so every word in the cells will be in one single line.
- Paragraph Mode – This mode allows you to separate the content into paragraphs. To move to a new line in the cell – please press CTRL + Enter.
- Lightbox – add a lightbox to images
- Borders – add borders around cells or rows.
- Compact – reduce the amount of white space.
- Highlighting – enable row highlighting on mouse over.
- Disable wrapping – disable wrapping of content in the table, so all text in the cells will be on a single line.
- Highlight the order column – highlight the column that the table data is currently ordered on.
- Row striping – for example – you use a table, but the table’s rows are difficult to separate visually, especially when there are many columns (or multiple lines to a row) – add row striping to a table, it will display rows background in two similar shades of colour to alternately.
Table Styling
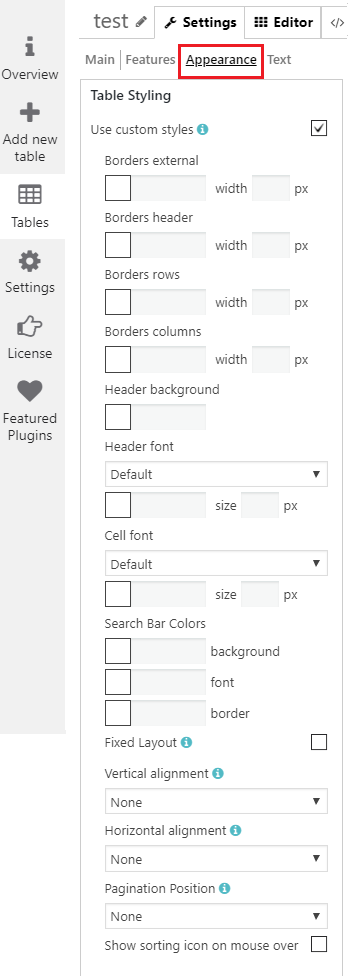
- Borders external – set the border colour and width in px. Borders header – set the colour and width for a header. These settings apply to a header, footer and “search by columns” field.
- Borders rows – set the colour and width for a header.
- Header background. These settings apply to a header, footer and “search by columns” field.
- Header Font – select the font for a header (the same for a footer), font size and colour.
- Cell background – select the colour for a cell background.
- Cell font – select the font for cells, font size and colour.
- Search Bar Colors. Here you are able to set the colour of background, font and border.
- Fixed Layout – set all columns of the same width.
- Vertical alignment – set the vertical alignment of table cell contents.
- Horizontal alignment – set the horizontal alignment of table cell contents.
- Pagination Position – set horizontal pagination buttons position.
- Show sorting icon on mouse over
Source
You have the ability to display the table or even its individual fields from the database – straight away on the front-end.
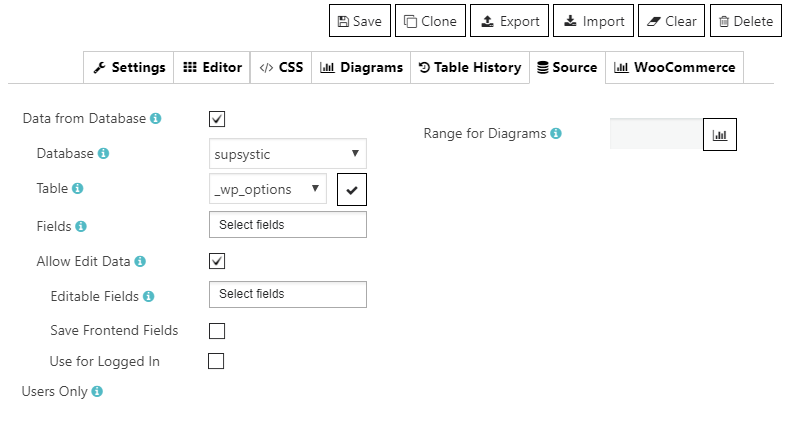
Here are the main options providing by Database Source Pro feature:
- Enable the option “Data from Database”.
- Select the table as a data source. In this list, you select the existing tables and views that you want to copy.
- Select the table fields. Only the selected fields will be used to build the table.
- Allow to Edit Data. If enable, let you edit database table data through the frontend fields.
- Select the fields available for editing. If nothing is selected, all fields will be editable.
- Save Frontend Fields. Allows saving data to the database table through the frontend fields.
- Use for Logged In Users Only. Allows using frontend fields only for logged in users.
- Allows using frontend fields only for users with selected roles. If there are no chosen roles – all logged in users will have the ability to use the frontend fields.
Step 4: Adding Data to the Tables by Supsystic
-
Editor
- Open “Editor” tab.

- Fill the table.
- Customize the data – here you can:
- insert row and column to the table
- set the font of text – bold and italic
- choose the text and background colour
- specify horizontal and vertical alignment
- choose the word wrapping
- insert media, video, pictures or links into your table
- add a comment to the chosen cell
- choose the format for a row – it could be a currency, per cent or date
- add a diagram or make some fields editable.
- Use all opportunities of a context menu:
- insert or remove rows and columns
- undo and redo buttons
- set “read-only” status for cells/rows/columns
- set alignment
- add or delete comment, read-only comment.
- copy and cut buttons
- merge cells feature.
The following opportunities are available by clicking the right button of the mouse:
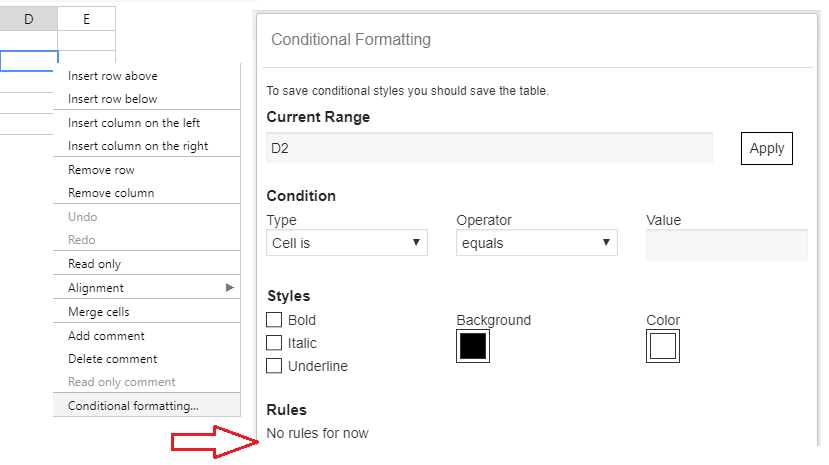
- insert row or column where you want
- remove row or column
- cancel or restore your actions
- enable “Read-only” mode for any cells, rows and columns and even for the whole table
- set the alignment of text
- merge or unmerge cells
- add or delete the comment
- conditional formatting
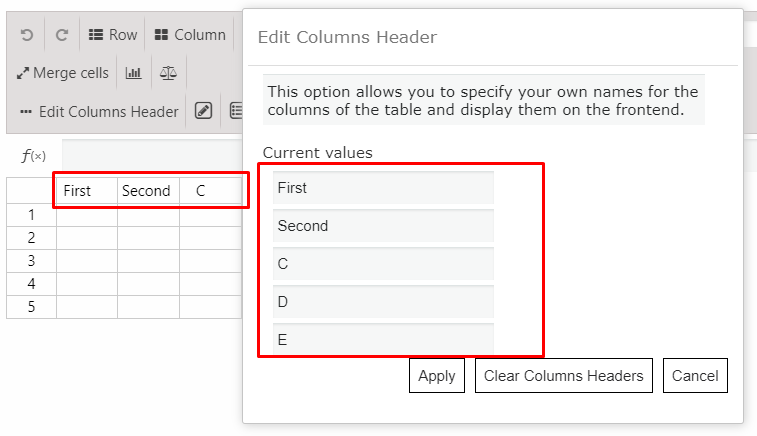
“Edit Columns Header” allows you to specify your own names for the columns of the table and display them on the frontend.
There are two simple steps to did it :
- Tap on Edit Columns Header feature button.
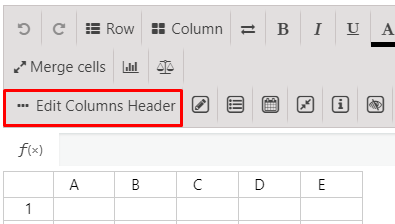
- And set up your own names of Columns Header in the appeared window.
Also, you can easily pass to editor from your front-end page by “Edit table” button.
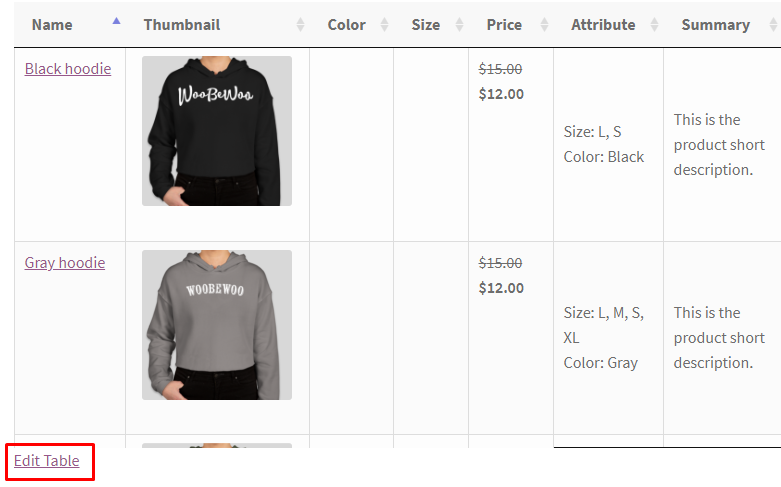
This button can see only users with data tables plugin access of your site.
Step 5: Preview settings
After you change some settings – with responsive data tables plugin, you can immediately see the result – in “Preview” and check the appearance of the table on Desktop, Tablet, Mobile view. Note that the table may have minor changes depending on the style that your theme has.
-
Diagrams
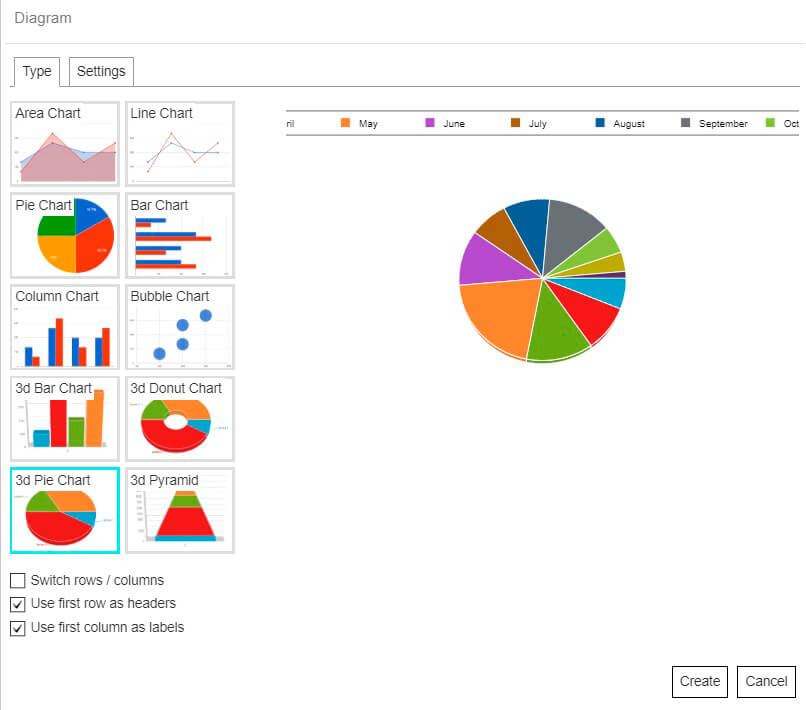
Diagrams feature (PRO option) allow you to visualize all the necessary information just in few steps with simplest settings.
There are six types of diagrams to choose from:
- Area Chart
- Line Chart
- Pie Chart
- Bar Chart
- Column Chart
- Bubble Chart
Check all the examples of charts.
-
Table History
Table History (PRO option) lets you create editable tables for your logged in users and easily view the changes.
It is and you can find it on the main settings menu of your Data Tables plugin.
Each of your users will be able to edit your table. Information about table changes will be displayed on the History Table tab, where you can select a user from the available list to check it.
Also here you will find a date and time changes.
Step 6: Displaying Tables on the website
- On the left navigation menu click “Tables”.
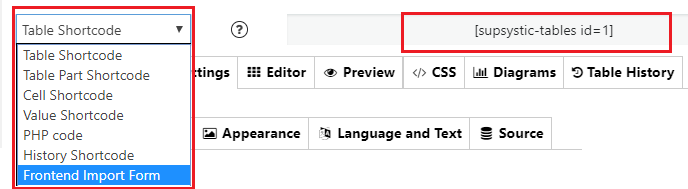
- Open the table which you need and copy the shortcode.
- Paste the shortcode into your post or page and Datatable plugin by Supsystic will automatically create a table on your page.
-
Settings tab
Also in the left side menu, you make additional settings for Table:
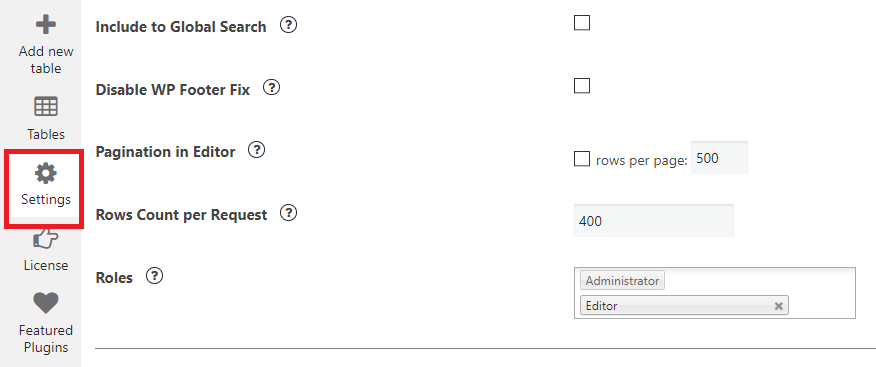
- Include to Global Search – Enable this option if you want to include the tables data to global site search
- Disable WP Footer Fix – Standard WP theme must call the wp_footer() function in site footer (see Theme Development). But sometimes it is not happen in custom themes. In this case our plugin will call its function forced because it needs it for correct work as the many other plugins. But if you have the problems in your site because of this feature – just enable this option to disable force call of wp_footer() function by our plugin
- Pagination in Editor – add pages to your table in Editor
- Rows Count per Request – set the count of table rows, which will be put into the one saving request. If your table has more rows – as many requests will be sent as need to completely save all table data. It can be useful if you have a large table and can not improve your server settings to save the table per single request. If you do not have problems with saving of tables it is better to left the default value – 400
- Roles – set the users roles, to add permission to use the plugin. The Administrator role has set by default
Here is a tutorial How to create Data Table with WordPress
Back to WordPress Data Tables Documentation.
Back to the main page of WordPress Data Tables Generator.